Devices
Devices are essential in SpotWalla. Without a device, there are no locations. Without locations, there are no trips.
Topics covered:
- Supported Devices
- Creating & Updating a Device
- Creating a SPOT XML Feed - New SPOT Account Manager
- Creating a SPOT XML Feed - Old SPOT Account Manager
- Finding the Garmin Raw KML Feed URL
- Connecting Your ZOLEO Device to SpotWalla
- Message Browsing
- Adding a Picture to a Message
- Secure Zones
- Uploading GPX Data
- Email Notifications
- Downloads
- Using the Email Interface
- Purging Messages or the Device
SpotWalla supports multiple devices, both satellite- and cellular-based devices. Satellite trackers include:
- Garmin Satellite Trackers - Any Garmin device with InReach technology.
- SPOT Trackers - All SPOT tracking devices.
- ZOLEO Satellite Communicator
Cellular-based phones apps support include:
Choosing the right device depends on where your travels will take you. If your travels are mostly within cellular coverage areas, then one of the smart phone applications will serve you well and provide the most cost-effective solution. But if you're a true globetrotter, a satellite-based tracker from Garmin, SPOT or ZOLEO is what you need.
Activations & Subscriptions
If your device of choice is a Garmin, SPOT or ZOLEO device, you will need to activate it with them and subscribe to the tracking service that meets your needs. Without doing this, your device will be useless.To create a device go to the Device Manager and click the New Device button.
You will see a screen similar to this:
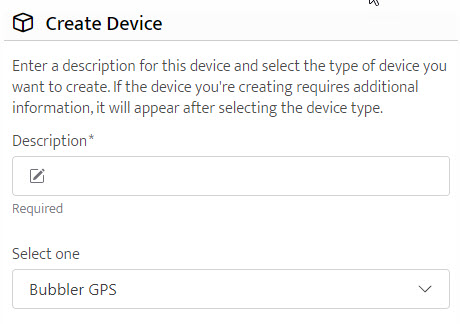
Enter a short description of the device. If you're into anonymity, don't use your name in the description. The description will appear in message detail popups and other places that appear on public location pages you may have joined.
Choose the type of device from the Device Type list. If you're creating a device for a phone app, no more information is required. If you're creating a Garmin, SPOT or ZOLEO device, additional information is required and will appear below the list after choosing the device type.
SPOT Device
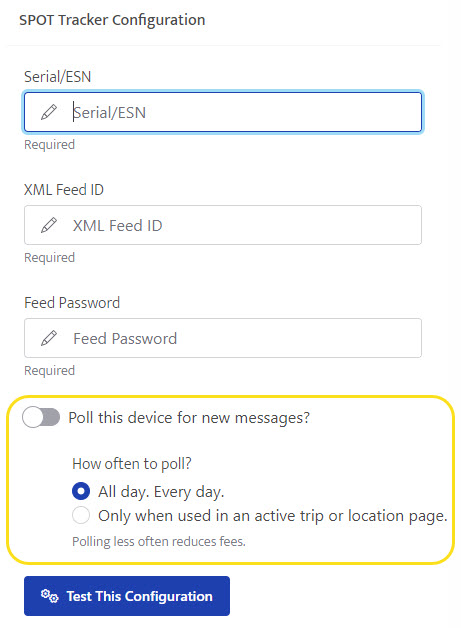
The following information is required to configure your SPOT device:
- Serial/ESN - This value uniquely identifies your device. No other SPOT device has the same number. You'll find this value somewhere on the device itself (e.g. battery compartment) or in the paperwork that came with the device. This value was required when activating your device with SPOT.
- XML Feed ID - SpotWalla acquires your device's location data by periodically polling SPOT for new locations. To do this, we use SPOT's XML Feed API. You will need to create an XML Feed in your SPOT account and configure your device in SpotWalla with the feed's ID. See the help links below.
- Feed Password - This password is optional and it is not your SPOT account password. If you added a password to the XML Feed when you created it, specify that password here.
If you need help creating a SPOT XML Feed for your SPOT device, try one of these help pages:
Creating a SPOT XML Feed - New SPOT Account Manager
Creating a SPOT XML Feed - Old SPOT Account Manager
Garmin InReach
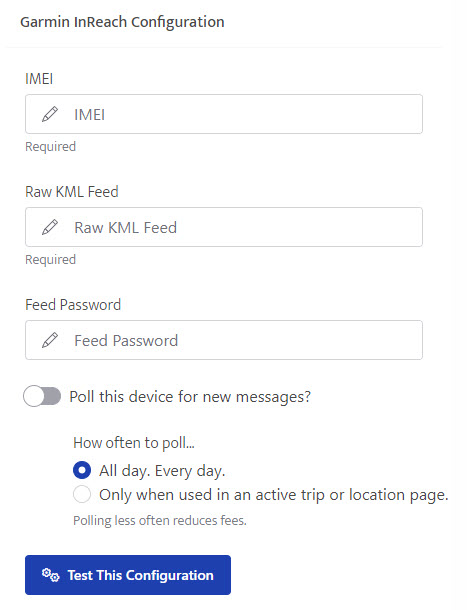
The following information is required:
- IMEI Number - This value uniquely identifies your device. No other InReach device has the same number. You'll find this value somewhere on the device itself (e.g. battery compartment) or in the paperwork that came with the device.
- Raw KML Feed - SpotWalla uses the Garmin Raw KML Feed API to acquire location data for your device. Your device has a Raw KML Feed URL and you'll need to log into your Garmin account to find it. This URL will be used to configure your device in SpotWalla. See the help page link below for help on how to find this URL.
- Feed Password - This is not your Garmin account password. This is a password you can assign to Garmin MapShare page and, if assigned, will be needed to use the Raw KML Feed.
For more details on finding your device's Raw KML Feed URL:
Finding the Garmin Raw KML Feed URL
ZOLEO Satellite Communicator
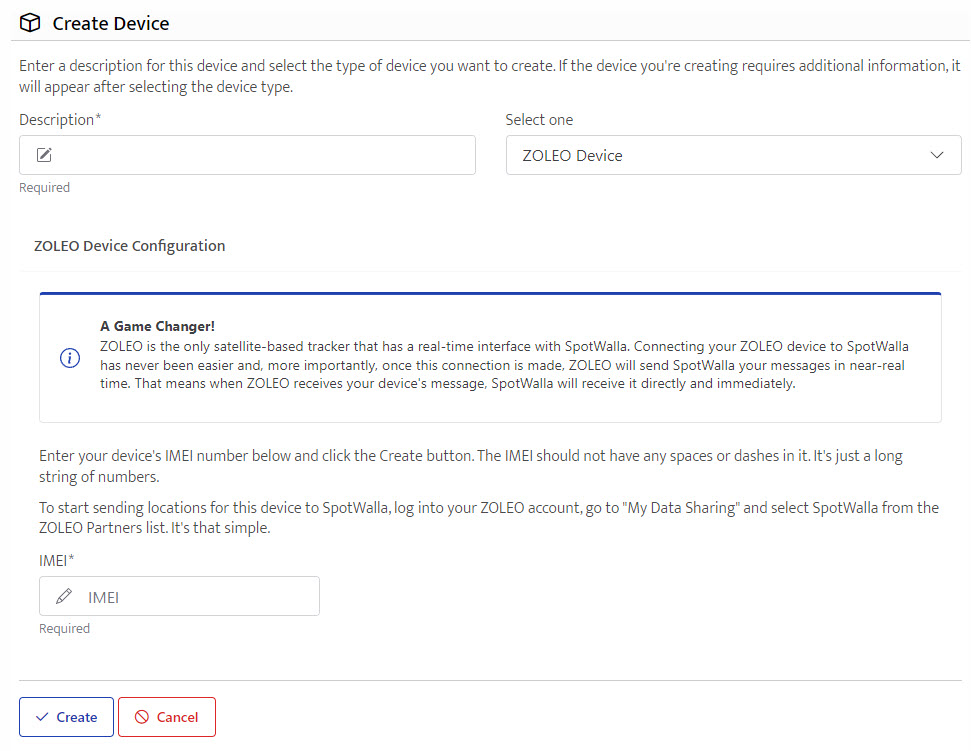
The following information is required:
- IMEI Number - This value uniquely identifies your device. No other ZOLEO device has the same number. You'll find this value somewhere on the device itself (e.g. battery compartment) or in the paperwork that came with the device.
To activate the ZOLEO/SpotWalla real-time interface, see this section:
Step 1. Log Into Your SPOT Account
The first step is logging into your SPOT Account. After logging in you'll see these options toward the top of the page:

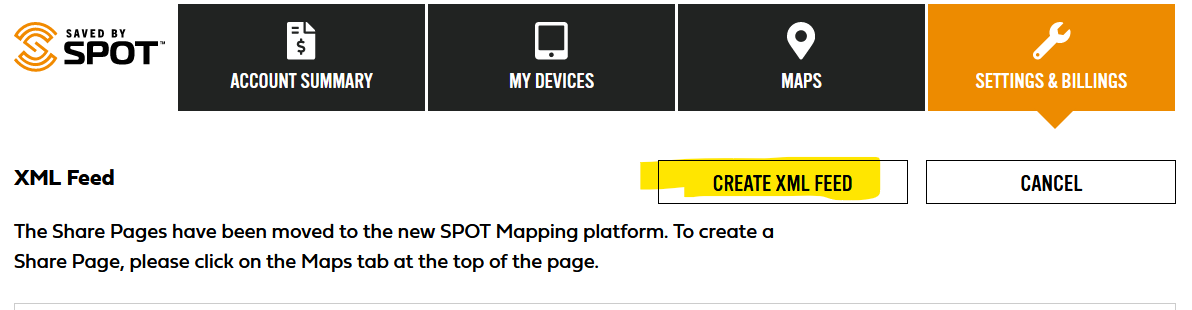
Step 2. Click the Settings & Billing option.
Scroll the list down and find the XML Feed section. Click the View/Edit button. On the next page you'll see a Create XML Feed button highlighted below. Click that button.
Step 3. XML Feed Options
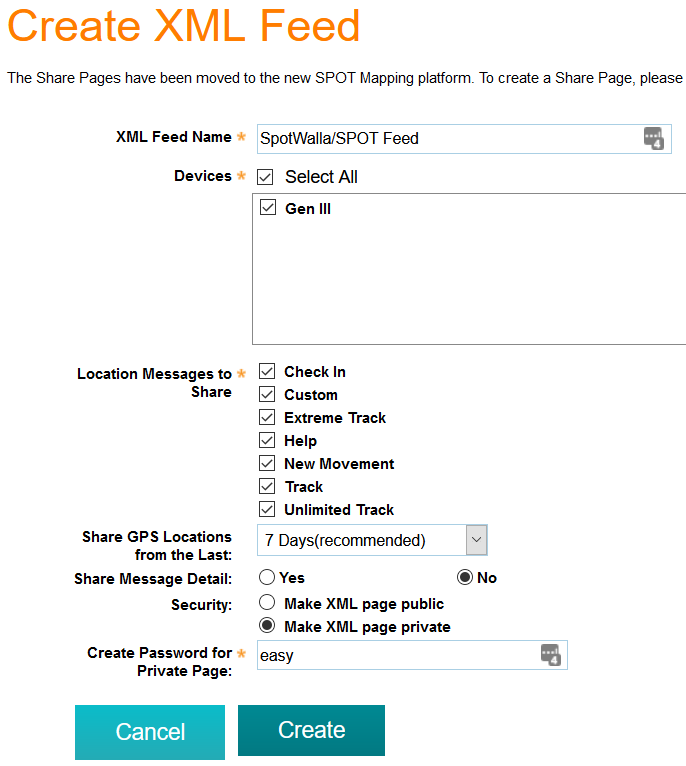
When setting the feed options, use this as a guide:
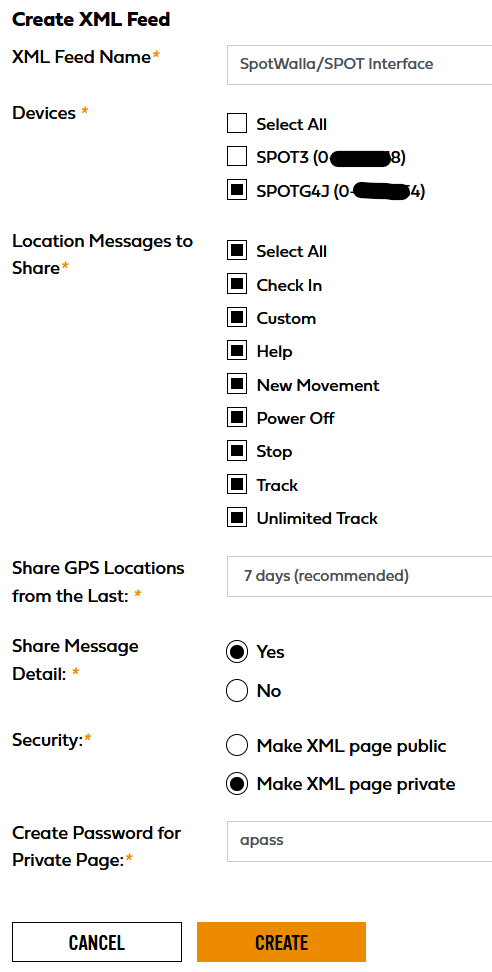
Set the feed name to SpotWalla/SPOT Interface or any other name that
identifies this feed as the one you're using for SpotWalla.
If you have multiple SPOT devices, you'll need to create an XML Feed for each device you want to use with SpotWalla. So in the Devices list, only choose the one you're setting up now.
For "Location Messages to Share" click the Select All option. Choosing all available location messages to share will ensure SpotWalla receives all available messages.
We recommend sharing locations from the last 7 days - the maximum number of days.
We recommend sharing message detail. If you've configured messages for your OK, Custom and Help messages in your SPOT account, enabling this option will allow the messages to flow into SpotWalla.
We recommand making your feed private and setting a password. Please do not use your SPOT Account password here. Something simple will do.
Step 4. Acquiring the Feed ID
After setting the appropriate options, click the Create button. You will be returned to the XML Feed page. The new feed will appear in the list. Something like this:
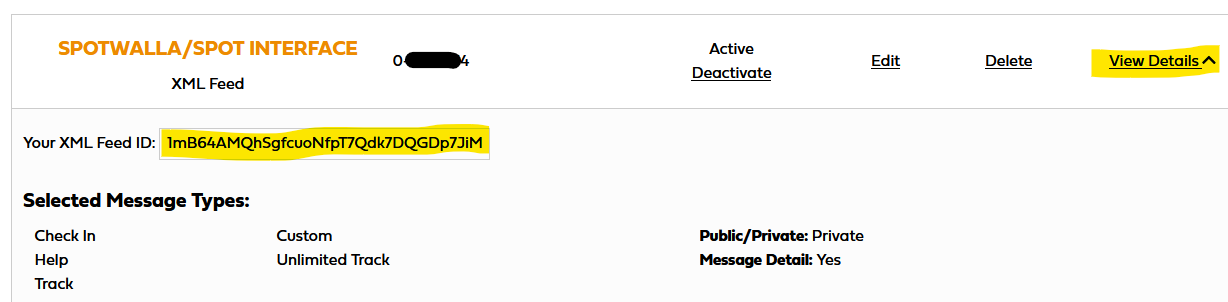
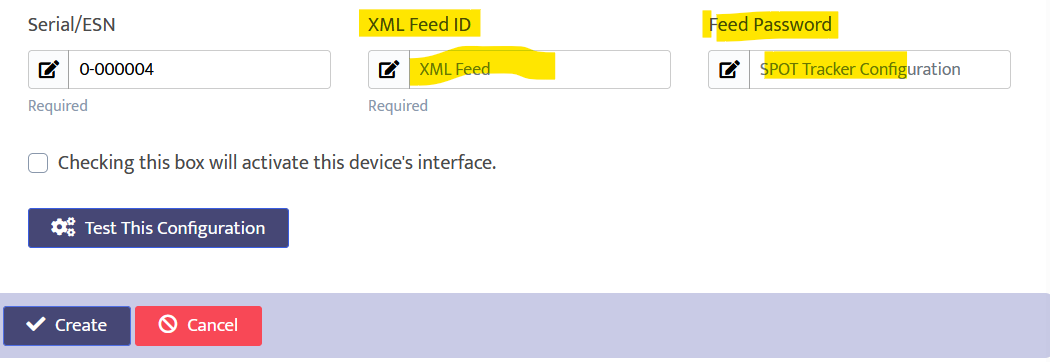
Click the View Details link (highlighted above) to expose the feed details. You will see the XML Feed ID (also highlighted above). Copy the XML Feed ID.
Now log into your SpotWalla account and update your device. Use the XML Feed ID and password in the fields highlighted below:
Step 1. Log Into Your SPOT Account
The first step is logging into your SPOT Account. After logging in you'll see these options toward the top of the page:

Step 2. Find the Create XML Feed Link
Click the XML Feed link. On the next page you'll see a Create XML Feed link highlighted below. Click that link.

Step 3. Feed Options
When setting the feed options, use this as a guide:
If you have multiple SPOT devices, you'll need to create an XML Feed for each one you want to use with SpotWalla. So in the Devices list, only choose the one you're setting up now.
Choose all available location messages to share. The other options are fine, although we recommend making the feed private and protecting it with a password.
Step 4. Acquiring the Feed ID
After setting the appropriate options, click the Create button and a popup window will appear like this one:
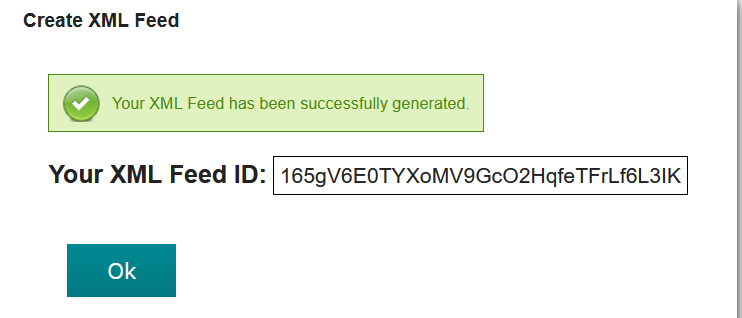
Copy the XML Feed ID from the dialog. If you set a feed password, take note of it. When setting up your device in SpotWalla enter these values for the XML Feed ID and Feed Password attributes.
Step 1. Log Into Your Garmin Account
The first step is logging into your Garmin Explore Account. After logging in you'll see these options toward the top of the page:

Step 2. MapShare Settings
Click the Social link in the menu. On the next page you'll see your MapShare settings:
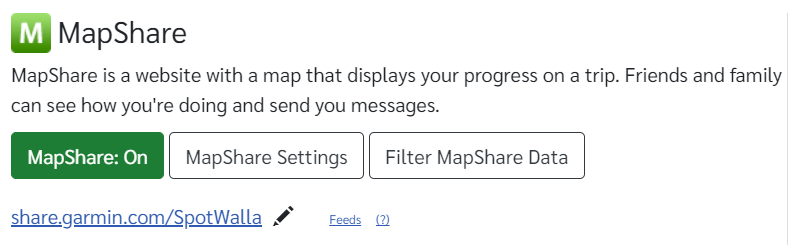
First, ensure that MapShare is enabled. You should see the green MapShare: On button. If MapShare isn't enalbed, enable it. We also recommend setting a password when enabling MapShare, but that's up to you. Click the MapShare Settings button to see the password and other options.
Step 3. The Raw KML Feed URL
Once MapShare is on, you will see a teeny-tiny Feeds link just to right of the MapShare URL. Click that link and you'll see this dialog:
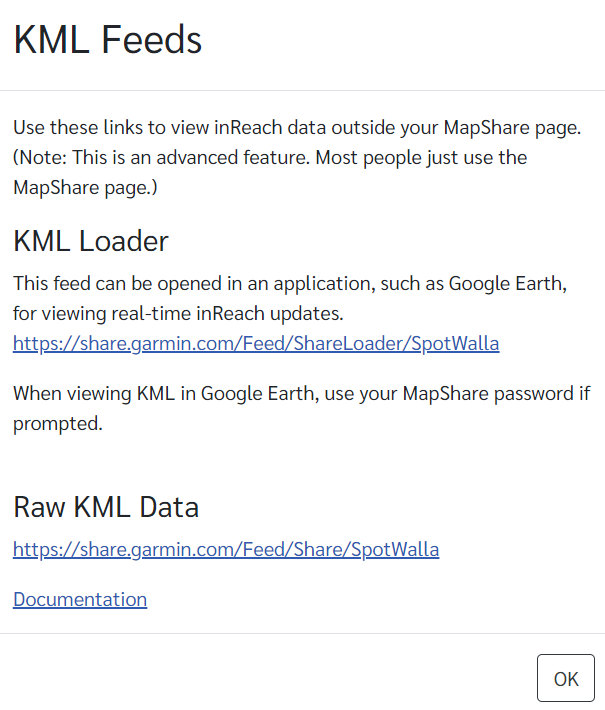
Copy the Raw KML Data link. If you set a password on your MapShare page, make note of it. When configuring your device in SpotWalla set the Raw KML Feed and Feed Password attributes using these values.
Step 1. Log Into SpotWalla and Create Your ZOLEO Device
Log into SpotWalla, go to the Device Manager and create your ZOLEO device. You should see a page that looks like:
Enter your device's IMEI number. Ensure it's correct. Do not enter any spaces or dashes. Just the numbers. Click the Create button.
Step 2. Log into Your ZOLEO Account
Now log into your ZOLEO account and choose SpotWalla from the ZOLEO partner's list. After logging in you will see a screen similar to this:

Click the the "My Data Sharing" link in the left-hand column. The next screen will display the ZOLEO Partner's list.
Step 3. Select SpotWalla from the ZOLEO Partners List

Select SpotWalla from the ZOLEO Partners list and click the Select button. Follow the directions to consent and complete the connection. It's that simple.
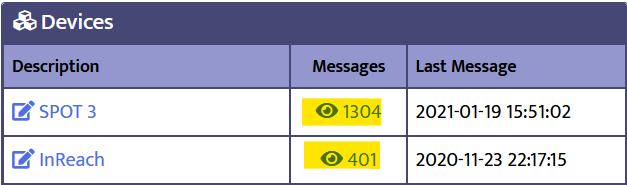
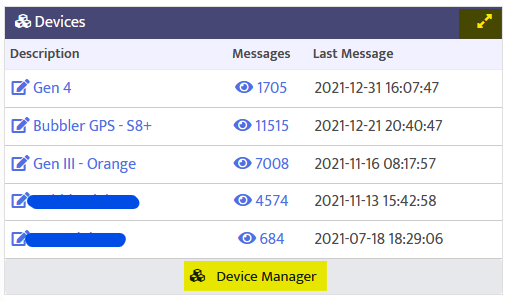
The Message Browser is an easy way to see your device's messages. There are two ways to access the browser. First, your devices are listed on the Dashboard. Click the number in the Messages column.
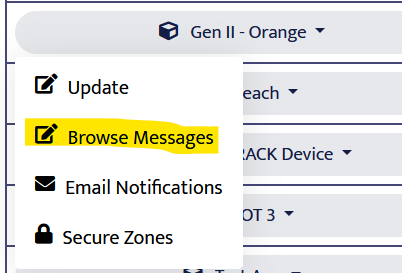
You can also find the message browser from the Device Manager. Find you device and click its name. Then select Browse Messages from the menu.
At the top of the browser you will see the number of pages as well as an easy way to jump to a specific date:
Jumping to a specific (nearest) date is a lot easier than scrolling through all the pages especially for those devices with hundreds of pages.
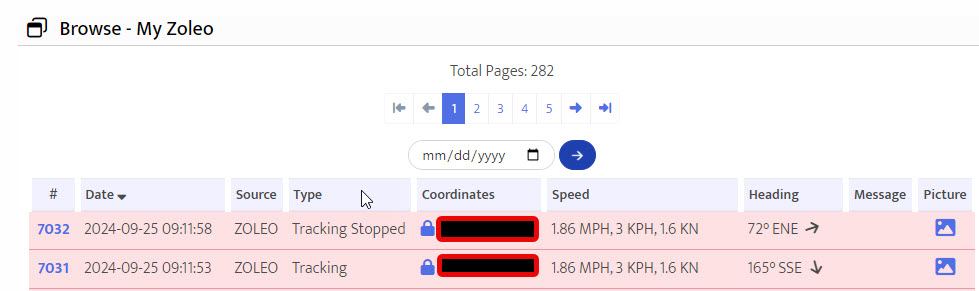
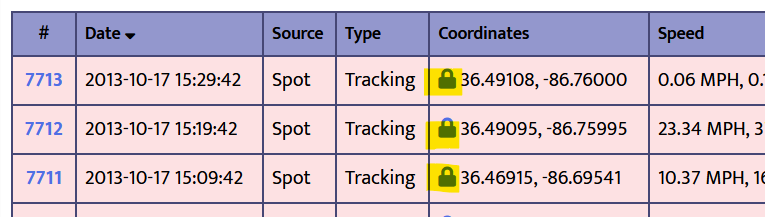
Depending on what you're using (laptop, phone, tablet) to browse messages, the browser will tailor the amount of information displayed. If you're on a laptop with a big screen, you'll see all information like this:

The fields displayed are:
- # - The message number.
- Date - The date the message was received in your chosen timezone.
- Source - The type of device that produced the message.
- Type - The message type.
- Coordinates - The coordinates of the location in decimal format.
- Speed - The speed at the time the message was sent. In most cases, speed is calculated and is not a reliable indicator of the actual speed. It is a reliable indicator of movement.
- Heading - Like speed, this is a calculated value. The value is based on the angle from the previous location.
- Message - Any message text sent with the message.
- Picture - The picture associated with the message. If your device can submit pictures (e.g. SpotWalla App or SWTracker), this is the picture. If your device cannot submit pictures, then you can add pictures by click the picture icon.
Secure Messages
If you have active secures for the device, messages/locations that fall within an active secure zone will have a red background.
Viewing Message Detail - Adding Pictures & Deleting a Message
To view the message detail and/or add a picture click either the message number (first field) or picture icon (last field). You'll see this...

To remove/delete the message, click the Delete button. If you're trying to associate a picture with this location, refer to this help section:
You can easily upload a photo and associate it with a message/location. Ensure you're logged into SpotWalla and you can find the location two different ways.
- From the message browser as discussed in the previous section.
- While viewing your trip.
From the message browser, find the message and click its number in the first column or the picture icon in the last column. If you cannot see the picture icon, you're viewing the website on a small screen like your phone. If you use a device with a bigger screen, the column will appear.

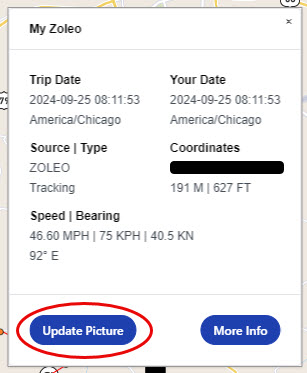
While viewing a trip, locate the location and click its icon. In the popup window click the Update Picture link:
If you're using the new SpotWalla App, you will not be able to add pictures to TRACE messages. Instead, find the nearest tracking (or other message type) message to use.
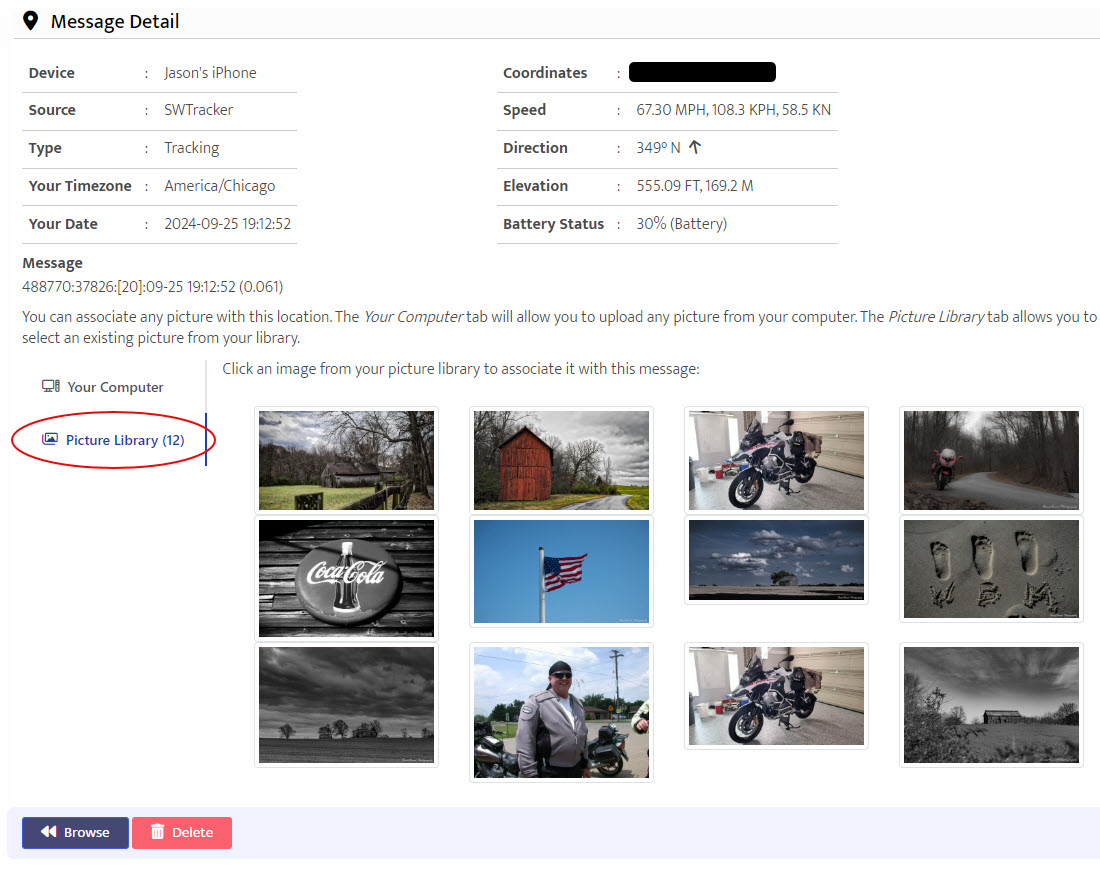
Either way, you'll wind up on the Message Detail screen. The screen below shows a location that does not have a picture associated with it yet:
Use the tab panels on the right to add a picture from Your Computer or from your Picture Library.
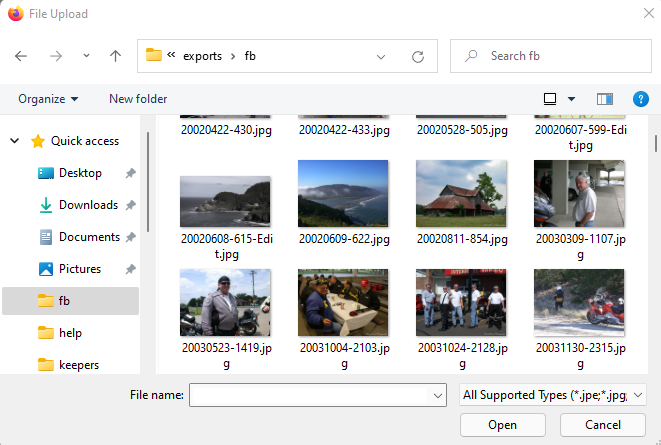
To add or update a picture from your computer you can drag and drop a picture in the area on the right where it reads "Drag and Drop a File". You can also click the same area and a dialog window will open and allow you to find and select the desired image. For instance:
If you choose the Picture Library tab, you click any picture from your library to associate it with the location:
After dragging and dropping or selecting the picture from your library, the picture will be processed and appear on the left:
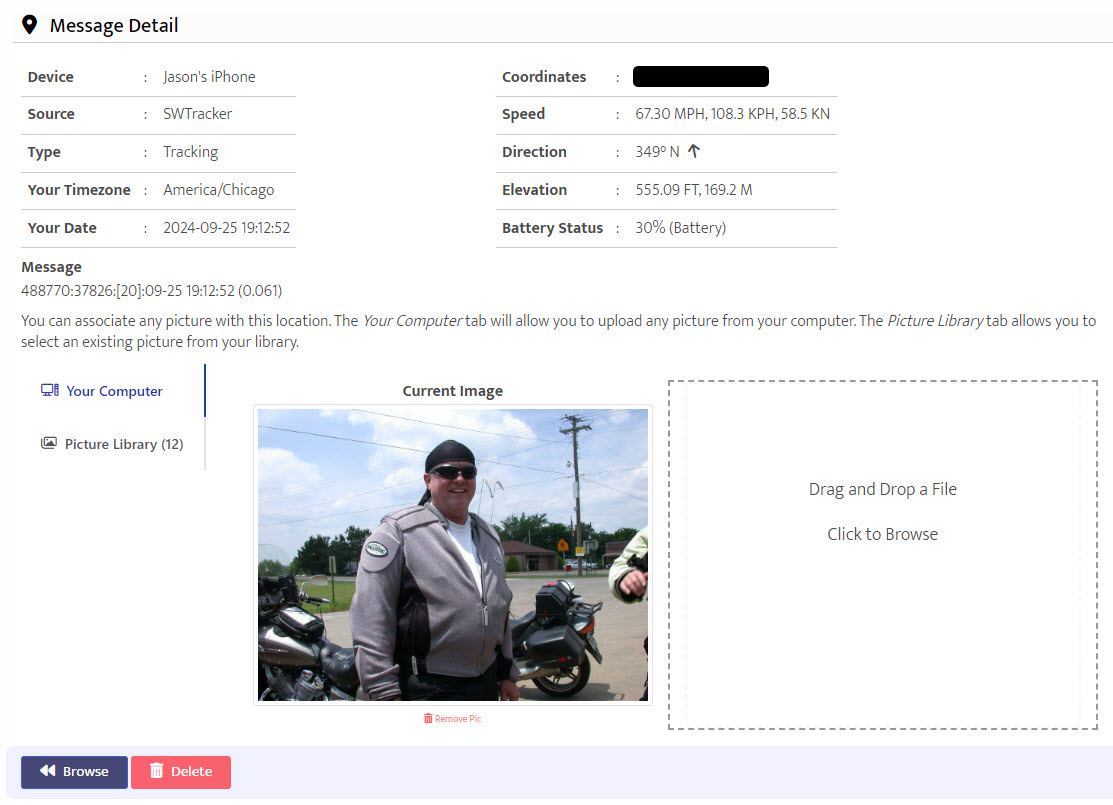
You can update the picture by simply repeating the process above. You can remove the picture by clicking Remove Pic link underneath the picture.
Secure zones are circular regions of the map where you do not want to display your location in trips or location pages. Each zone is defined by a center location and a radius. There are two types of secure zones:
- Dynamic Zone - Every device has one and only one dynamic zone. This zone follows you. Its center is always on your last known location. You can adjust the radius to suit your needs. A dynamic zone is useful when you want to share your travels publicly, but don't necessarily want to expose your last known location. For instance, where you stopped for the evening or for lunch or just to keep people guessing on your next move.
- Static Zones - A device can have zero or more static zones. These zones have a static center and a radius. Static zones are useful to safeguard your home location, grandma's house, your place of work or any other region where anonymity is desired.
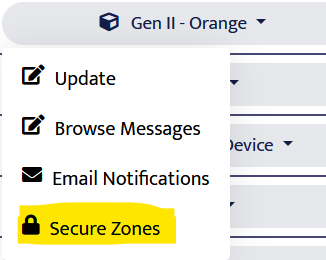
There are two ways to manage secure zones. First, from the Device Manager. Find your device and click its name. Choose Secure Zones from the menu. Second, from the device's Message Browser you can click the lock icon next to any message's coordinates. The secure zones page will appear and the coordinates you clicked on will prepopulate the form.
The secure zone management screen will look like this...
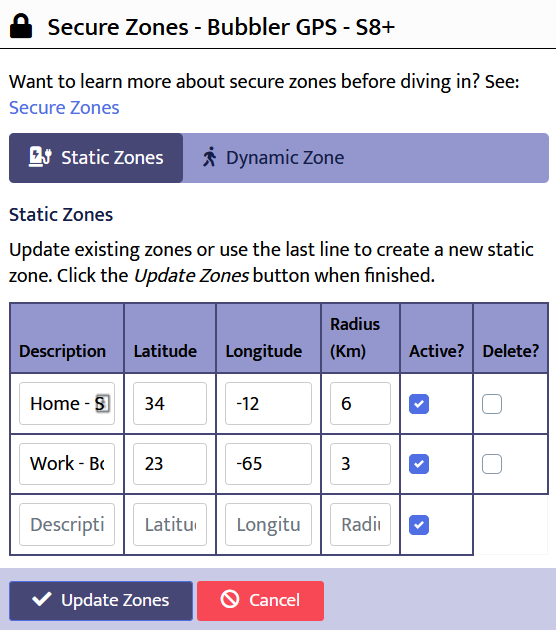
The tabs at the top, Static Zones and Dynamic Zone, are used to group your zones. Clicking either tab will display the zones of that type.
Since this device doesn't have any static secure zones defined, you just see the empty fields that are used to define a new static zone. The fields are:
- Description - A short description of this zone (e.g. Home, Work).
- Latitude - Used to define the center of this zone.
- Longitude - Used to define the center of this zone.
- Radius (Km) - The zone's radius in kilometers. One mile is about 1.6 kilometers.
- Active - Indicates if the zone is active or not. A checkmark indicates active.
- Delete> - For zones that exist, checking this box and clicking the Update Zones button will delete this zone.
All static zones will be displayed in the list. You can update any of them or check the box to delete a zone. Clicking the Update Zones button will apply any changes made.
The dynamic zone tab looks like this:
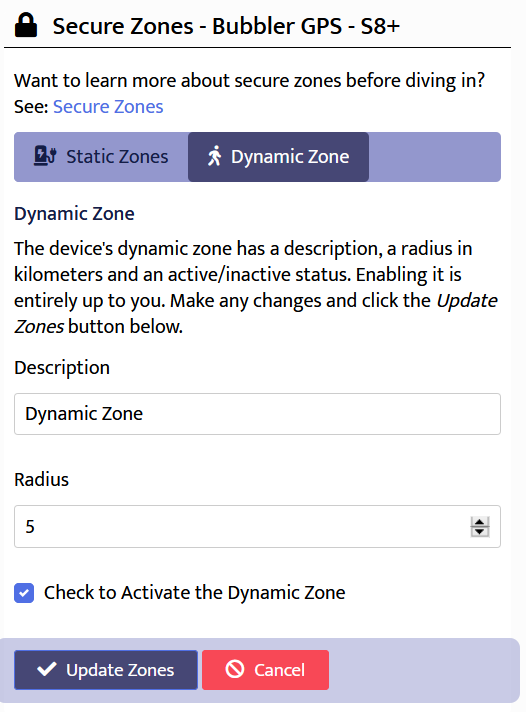
A device's dynamic zone cannot be deleted. You can update its description, radius and active status. By default, the dynamic zone is not active. To enable it, check the box next to Check to Acivate the Dynamic Zone and click the Update Zones button.
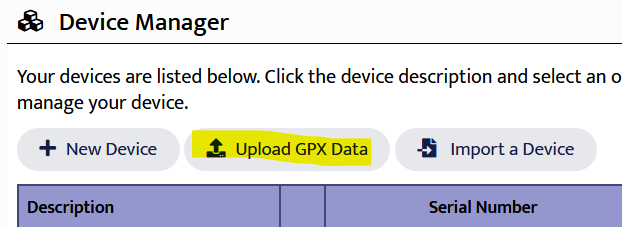
Click the Upload GPX Data button to start the upload process. You'll see:
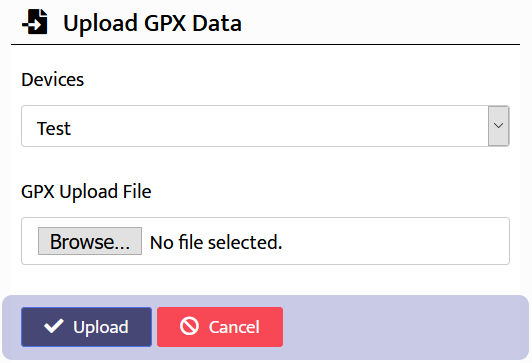
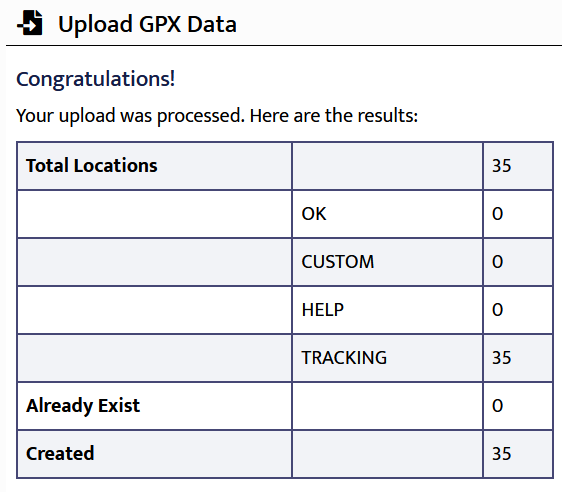
Choose the device you want to use. Then click the Browse... button and find the GPX you want to upload and process. Now click the Upload button. When the file is finished processing you will see the results.
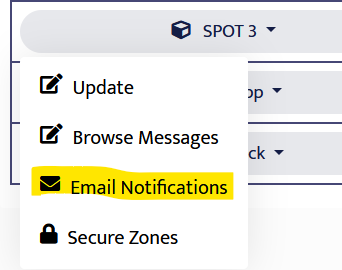
Email notifications allow you to send an email to any number of people when your device produces a chosen message type. Each device has its own notifications. You can manage them by going to the Device Manager. Find your device and click its name. Choose Email Notifications from the menu.
The notifications page will look similar to this:
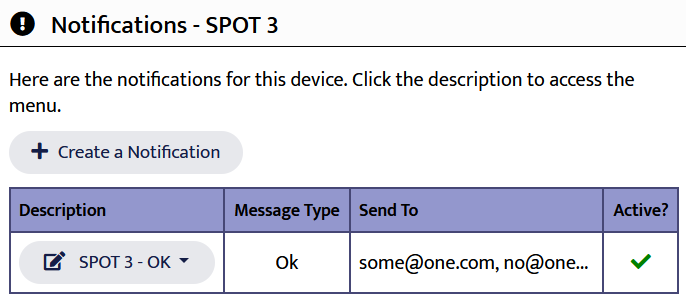
If the device has notifications, you will see them in a list. To update or delete an existing notification, click its name and select Update or Delete from the menu. To create a new one, click the Create a Notification button. You'll see this page:
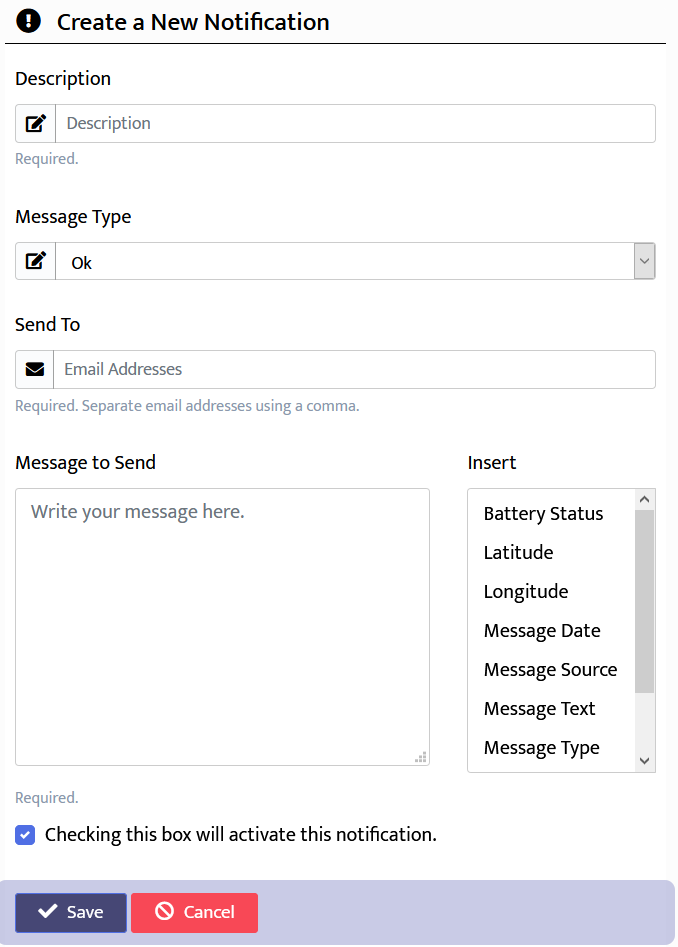
Enter a description and choose the message type. The list of message types is tailored to the type of device. So if it's a SPOT device, you'll see Ok, Help and Custom message types.
Now enter one or more email addresses in the Send To field. Separate each email address with a comma.
The message you want to send is customizable using parameters. Before sending the email, SpotWalla will replace each parameter in the message with the information it represents. You can easily add parameters to the end of your message by clicking a parameter name from the list to right of the message.
Here's the list of available parameters:
| Parameter | Description |
|---|---|
%batteryStatus% |
The battery status at the time the message was sent. Note that some devices do not report their battery status. |
%latitude% |
The latitude coordinate of this message. |
%longitude% |
The longitude coordinate of this message. |
%messageDate% |
The date and time the message was sent in the user's chosen timezone. |
%messageSource% |
The type of device that produced the message. |
%messageText% |
The message text sent with the message. |
%messageType% |
The type of message sent. |
%privateTrips% |
A list of active private trips. |
%publicTrips% |
A list of active public trips. |
Here's a sample notification I send when sending an OK message from my SPOT device. I use OK messages to mark overnight stops.
%privateTrips%
Please don't share that link with anyone. Love you.
The %privateTrips% parameter will be replaced with the list of active private trips
and my loved ones will be able to click the link and see where I'm at.
You can choose to activate/disable a notification. Remember to click the Save or Update button at the bottom of the screen.
You can download your device data in three formats - CSV, KML and GPX. From the Device Manager click the

The downloads screen will appear:

Choose the type of download and the device you want to use. If you want the download to honor active secure zones, ensure the Apply Active Secure Zones? checkbox is checked.
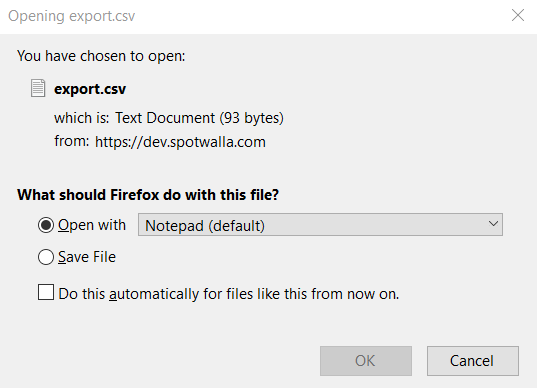
Now choose the start/end dates and click the Downloads button. Depending on your operating system, how it's configured and what options you've set, you will likely get an option to open or save the download file.
When you're finished downloading files you can click the Devices button to get you back to the Device Manager screen.
The email interface allows anyone or anything to create messages for a device simply by sending an email message. For this to work, the message should be sent using plain text and contain the following fields at a minimum:
datetime: <datetime>
latitude: <latitude>
longitude: <longitude>
The following fields are optional:
type: <message type>
small url: <small pic URL>
large url: <large pic URL>
no-reply-on-success
Each field has a specific format and strict requirements:
| Field | Description | ||||||||||||||||||||||||||||||
|---|---|---|---|---|---|---|---|---|---|---|---|---|---|---|---|---|---|---|---|---|---|---|---|---|---|---|---|---|---|---|---|
<device key> |
The device key is a unique identifier of one of your devices. Your device keys are listed below: Please LoginTo see your device keys, please log into SpotWalla and visit this help page. |
||||||||||||||||||||||||||||||
<datetime> |
This is the message's date/time stamp and must be specified in your timezone. If you don't know what your timezone is, check your profile. SpotWalla does not adjust this time at all. Here's an example...
The date part is in yyyy-MM-dd format. Be sure and zero-pad the month and day. The time part is in hh:mm:ss format. The hour is in 24-hour format. So 08 is 8AM and 20 is 8PM. Be sure and zero-pad all three components, if necessary. |
||||||||||||||||||||||||||||||
<latitude> <longitude> |
The coordinates of this location. Must be specified in decimal format. | ||||||||||||||||||||||||||||||
<message> |
A short message about the location. No longer than 1024 characters. Must be on a single line. | ||||||||||||||||||||||||||||||
<message type> |
Indicates the type of message to create. This is case-sensitive. Should be one of the values below:
|
||||||||||||||||||||||||||||||
<small pic URL> <large pic URL> |
If you're storing pictures somewhere and want to associate a small/large pic, use these elements to indicate where the pictures are stored. These URLs must start with either http:// or https://. However, https:// is preferred. | ||||||||||||||||||||||||||||||
no-reply-on-success |
By default the email interface replies to each message it receives in order to inform the sender if the location data was processed successfully or failed. The email interface will always reply if errors are present, but if you want to supress the reply when successful, simply include this command on its own line in the email. |
Putting all of this together and assuming the device key is 9e8a-9z0ac-c23d, here's a sample email message:
datetime: 2021-02-17 22:56:00
latitude: 35.12312
longitude: -95.23123
message: I was here.
type: OK
small url: https://some.com/image1.jpg
large url: https://some.com/image2.jpg
All you have to do is send the email to [email protected]. A reply will be
sent indicating the success or failure of the message. When you gain confidence in the interface,
you can include the no-reply-on-success command to suppress the reply when the
request is successful.
A user may want to purge the messages from a device or purge a device from SpotWalla in order to reduce the cost of using SpotWalla. We don't encourage removing data unless you are absolutely sure it's the right thing to do. These actions are permanent.
To purge messages or an entire device, follow these steps...
- Log into SpotWalla
-
On the Dashboard, go to the Device Manager by clicking one of the highlighted elements below.
-
Find the device and click its name. Then select Delete from the menu.
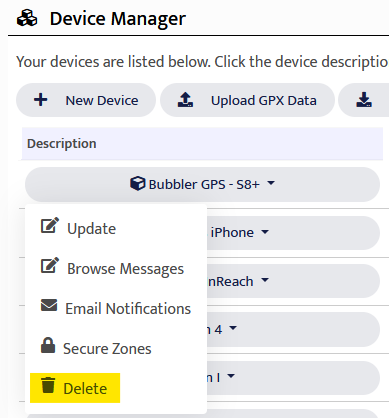
-
On the next screen, confirm your intentions by typing
delete allto purge the device from SpotWalla or typedelete messagesto delete the device's messages only.
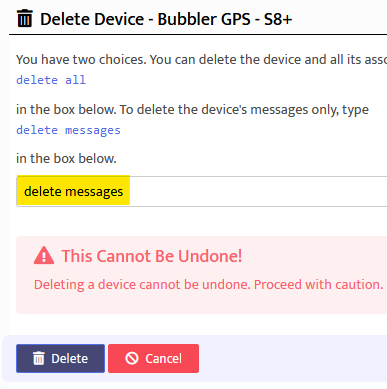
Then click the Delete button and you're done.